


Last time in Part 1, I covered making course content accessible that is viewed directly within a web browser. This time in Part 2, I will cover content that is usually downloaded first and viewed outside of browsers, specifically Microsoft Word and PowerPoint. Downloaded content includes word processing documents, spreadsheets, presentations, and Acrobat / PDF files.
The same general rules for making your web content accessible also apply to content that is downloaded. Although I will not restate all of the rules from Part 1, please remember to apply them to this type of content too.
Microsoft Office – Word and PowerPoint
Every application in the Microsoft Office suite is unique, but many of the procedures for creating accessible content for each are the same or very similar. First, let’s look at what both Word and PowerPoint have in common, and then move on to additional information for PowerPoint.
The version of Office referred to in this post is Microsoft Office 2016. Office usually does not change much between versions, so most, if not everything covered should be relevant for at least the next few versions.
Adding Alternative Text
Word and PowerPoint support embedding objects such as images, charts, SmartArt, shapes, and tables. PowerPoint also supports embedding video and audio. Each object must be assigned an alternative text description to be accessible. In all Office files, the alternative text description is broken down into two fields: Title and Description. You can certainly use both fields, but because some screen readers ignore the Title field, be sure to always at least fill in the Description.
The procedures for adding alternative text to the different types of embedded objects types are almost identical. To add alternative text to an embedded object, for example, to an image:
- Right-click on the embedded object, which in this case will be the image, and from the drop-down menu choose “Format Picture…”
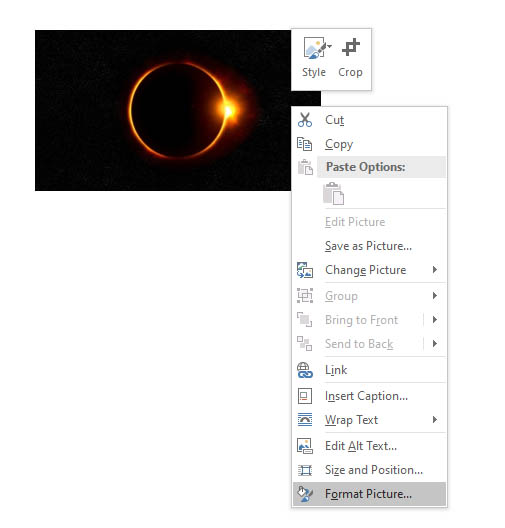
- In the Format Picture pane, for Word, click on Layout & Properties or for PowerPoint, click on Size & Properties.

- Click on the arrow to the left of Alt Text to reveal the Title and Description boxes.

- Fill in a title and description.
The only differences for adding alternative text to other embedded objects are in the object name referred to within the drop-down menu in Step 1, and in the heading pane name in Step 2.
Note that charts and SmartArt are larger objects that are made up of smaller ones. Therefore, you need to select the entire larger object. Right-click in an empty area of the chart or SmartArt object until you see either the “Format Chart Area…” or “Format Object…” choice respectively, listed in the drop-down menu. If you clicked in an area that is not empty, such as on an individual shape within a SmartArt object, or on a bar graph in a Chart, then you selected that individual piece rather than the entire larger object that it is a part of.
Alternative text for tables
In PowerPoint only, a table is considered a Shape object. Add alternative text to a table in PowerPoint by following the same procedure for other embedded objects.
In Word, adding alternative text to tables is slightly different.
- Right-click inside the table, and from the drop-down menu choose “Table Properties…”
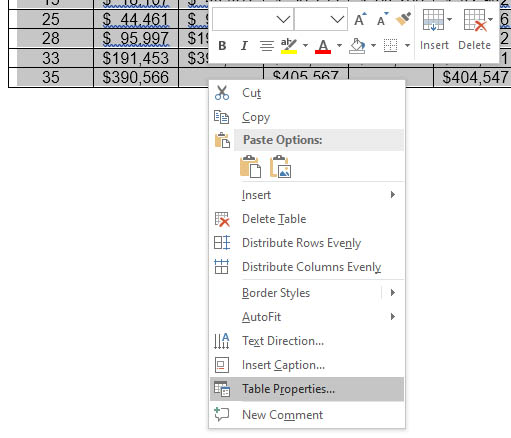
- In the Table Properties dialog box, open the Alt Text tab.
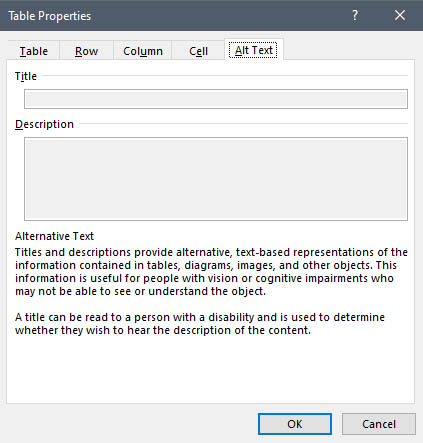
- Fill in a title and description.
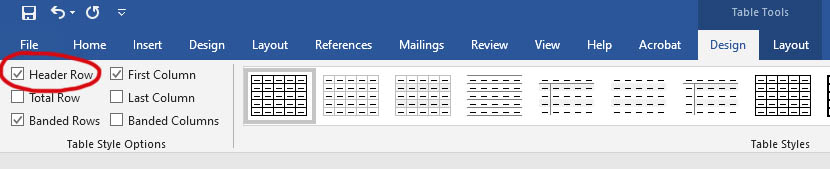
Use only simple tables and set headers
Word and PowerPoint have limitations for making tables accessible. Tables should be kept very simple, with one row of column headers, and no tables nested within tables. Do not use merged or split cells within a table.
For a simple table structure, set a header row after you’ve created a table. This applies to both Word and PowerPoint.
- Click inside the table to select it.
- Under the Table Tools menu, choose the Design tab.
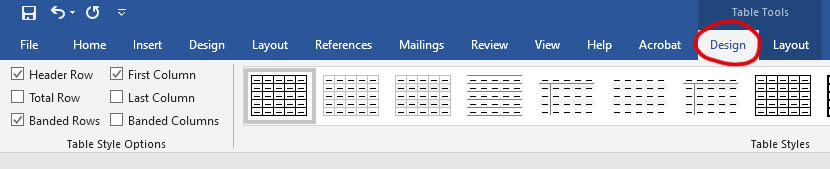
- Check the Header Row box.
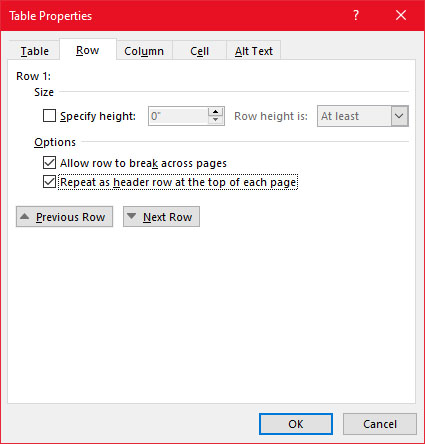
Applicable to Word only, if the table spans multiple pages, repeat the column headings.
- Right-click in a cell of the row with the column headers.
- Choose “Table Properties…” from the drop-down menu.
- Select the Row tab in the Table Properties dialogue box.
- Check the box for “Repeat as header row at the top of each page.”
Add a summary and data table for charts and graphs
Charts and graphs can be very complex, and difficult to describe using only alternative text. It can be helpful to also provide a summary and if possible, a reference to an associated data table located near the chart or graph. Data tables should be kept very simple, as described in the previous section about tables.
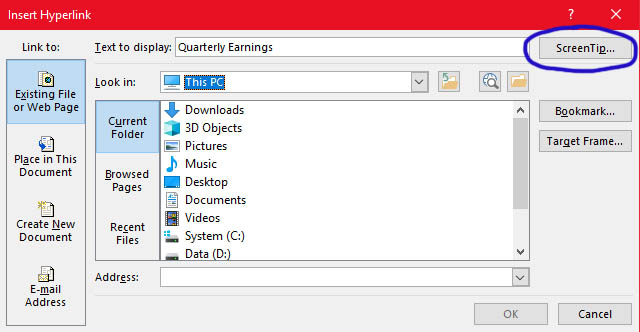
Use meaningful hyperlink text and add screen tips
Just as with web content, hyperlinks should be given meaningful link text names. Microsoft Office also adds the option of adding a ScreenTip for each link. A ScreenTip is text that appears when you hover your mouse pointer over the link. It provides additional information as to where the link takes the reader. When you insert a hyperlink, click on the ScreenTip… button within the Insert Hyperlink dialogue box to set the Screen Tip text.
Set the Document Properties
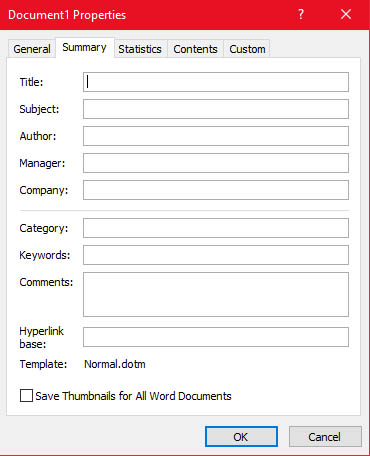
Fill in the Document Properties, which include Title, Subject, Author, Keywords, and Language. These elements are read by search engines and assistive technology devices for locating and providing information about the document’s contents.
To get to the Document Properties in Windows, go to File->Info->Properties. Click on Properties, and then on Advanced Properties, which opens up the Document Properties dialogue box. In Mac OS X, go to File->Properties.
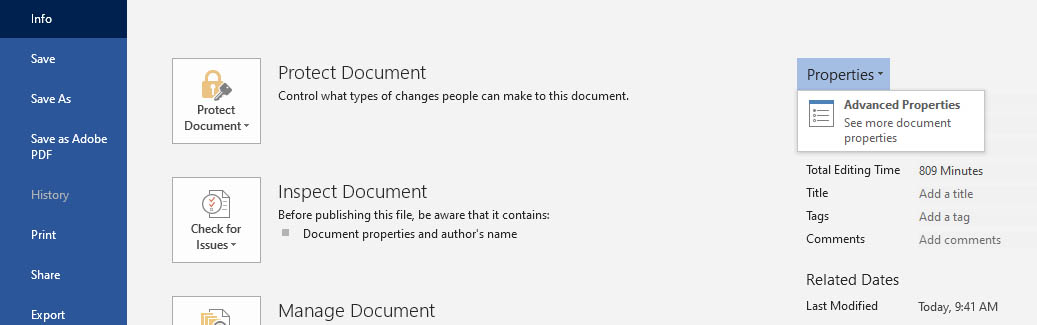
Open the Summary tab and fill in the Title, Subject, Author, Keywords, and any other fields you wish to use.
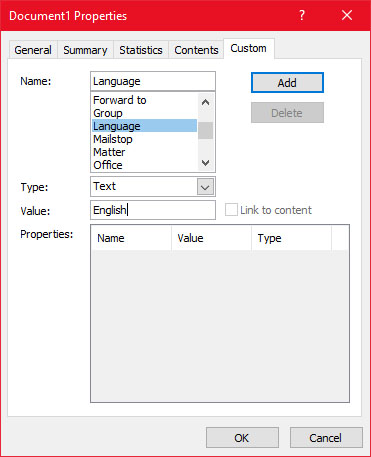
Set the language by opening the Custom tab. For Name, type in Language, or choose it from the menu. For Type, choose Text. Type in the language in the Value field. Click OK to close the dialogue box and save your file.
Provide a descriptive filename
Use a descriptive filename that informs the user about the file’s contents.
Use the Accessibility Checker
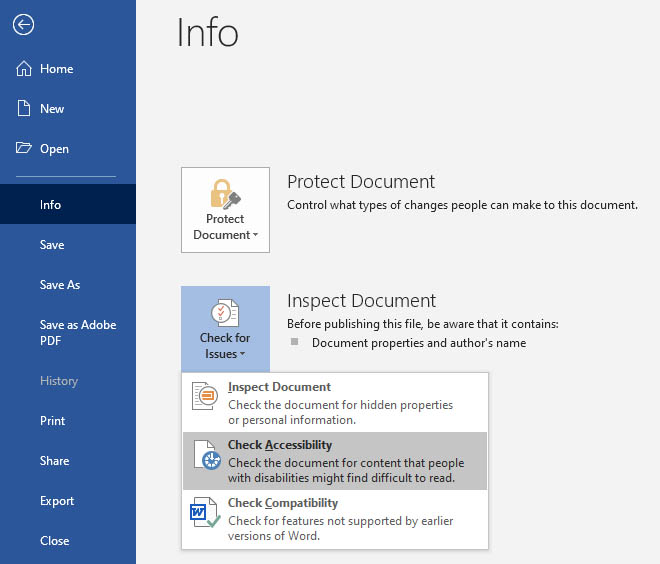
Each Office application includes an accessibility checker that you can use to check for and correct accessibility issues. In Windows, the accessibility checker can be found under File->Info->Check for Issues->Check Accessibility. In Mac OS X, the accessibility checker can be turned on under Tools, and then Check Accessibility.
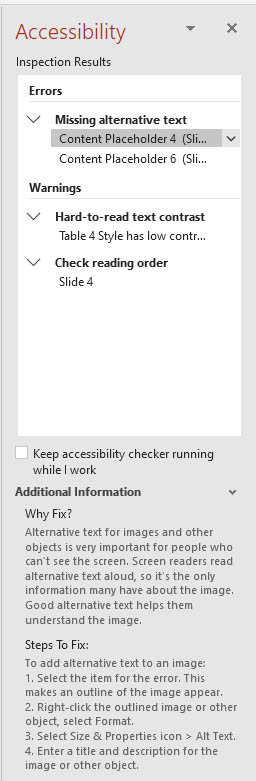
The accessibility checker will display a list of errors and warnings if it found any problems. Clicking on each error will jump to the location in the document of the error and provide an explanation and information on how to correct it.
Converting files to PDF / Acrobat
Microsoft Office files can be converted to PDF directly within each Office application. PDF files created from Office will contain most of the information needed to be accessible. Ideally, the converted PDF files should be opened with Adobe Acrobat Pro, so they can be checked with its accessibility checker and corrected if necessary. Typical corrections that might be needed are: hiding decorative images and assigning scopes to table headers.
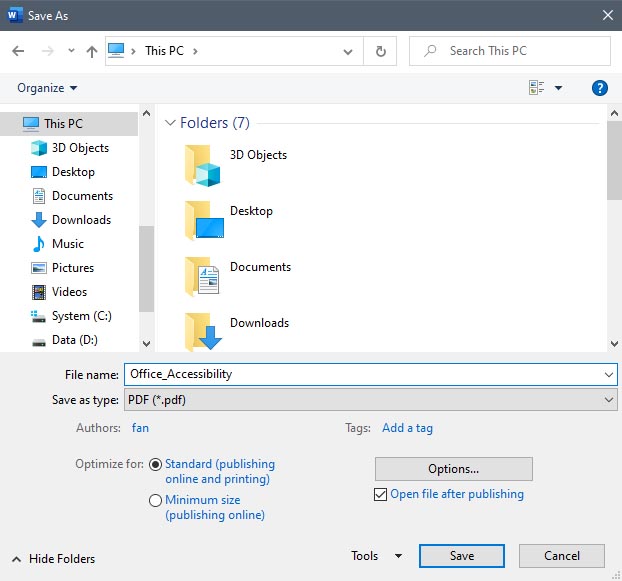
To convert the file to PDF, go to File->Save As, and then choose PDF as the file type.
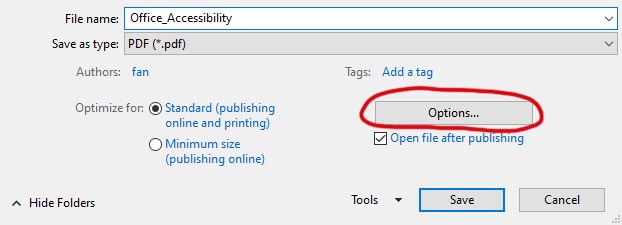
Next, click on “Options…”
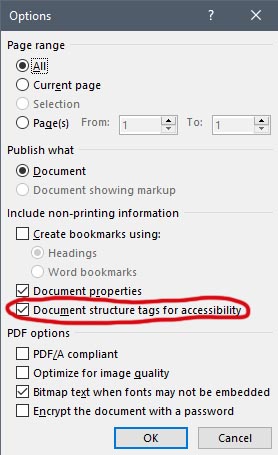
For PowerPoint, in the Range section, you’ll have the choice of saving All slides, Current Slide, or Selection. In the Options dialogue box, in the section “Include non-printing information,” make sure “Document structure tags for accessibility” is checked.
Microsoft PowerPoint
Now let’s discuss additional measures you can take to create accessible PowerPoint presentations.
Use built-in templates and themes
Templates and themes can be used to control the look and layout of slides in the presentation. A template or theme includes colors, fonts, text, backgrounds, and effects that can be applied to each slide. Not all templates and themes are set up to be accessible. A good start to create presentations that can be seen by someone who is visually impaired, is to use a template or theme with a simple background, and with good contrast between the text and background.
Set and check the reading order for slides
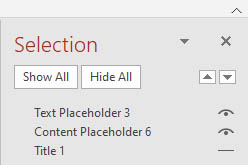
Each element on a slide is read by screen readers in the order in which it was added to the slide. Using slide layouts, as explained in the next section, is an easy way to ensure that the reading order is presented in a logical order, and is the same for everyone whether or not they are using assistive technology. You can check the reading order and modify it if necessary, by selecting from the menu: Home->Arrange->Selection Pane.
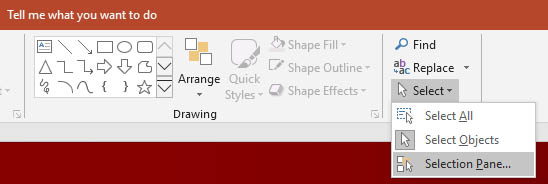
The Selection Pane lists all of the elements in the slide, with the bottom element as the first in the reading order, and the top element as the last.
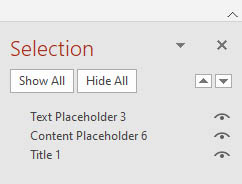
Click and drag elements to rearrange them, or use the up and down arrow buttons. Click on the eye icon next to an element to hide or unhide that element. This is particularly useful for when you want to hide a slide title.
Use Slide Layouts
A slide layout is a blueprint for a slide. Slide layouts determine what type of content can be on a slide, and where it is positioned on the slide. Some common layouts are for slides with: a title only, placeholders for multimedia and charts, and text and content separated into two columns.
Assign unique, descriptive slide titles
Screen readers generate a list of slide titles that users can read through, which allows them to go directly to a slide of interest. Using unique, descriptive titles avoids confusion as to what slide a user is viewing. If a slide is continued onto the next slide, it can be helpful to use titles such as “Title 1 of 2,” or “Title (continued).” Make sure every slide is given a title. If you need to hide the title for a slide, for example, to save space on a slide, you can do so by using the Selection Pane as explained in the “Set and check the reading order for slides” section above.
Provide captions, transcriptions for video and audio
All videos included in a presentation need to be captioned. If a video is added in the form of a link to its location on a website, such as YouTube, then captioning should be provided on the hosting site. Video content that is directly inserted locally from a file on your computer should be captioned and given a transcript, which can be added in the slide’s Notes section. Similarly, transcripts or captions should be provided for slides including audio-only content. For information on adding captions to video and audio, visit Microsoft’s page: Add closed captions or subtitles to media in PowerPoint.
Add voiceover narration
Consider adding voiceover narration to your presentation. Use the Notes section to add the transcript for each slide’s audio and be sure to make it verbatim so that assistive technology users access the same information as everyone else. If your narration consists only of reading the text of each slide and nothing more, then you probably do not need a transcript.
Periodically check your documents for accessibility
As mentioned in Part 1, accessibility is not a one-time fix. Accessibility can be affected by updates in the document and changes in software and assistive technology. Check your documents periodically along with your course to maintain accessibility.